Configure LR200E (LoRa to Ethernet) Ethernet Settings
First of All
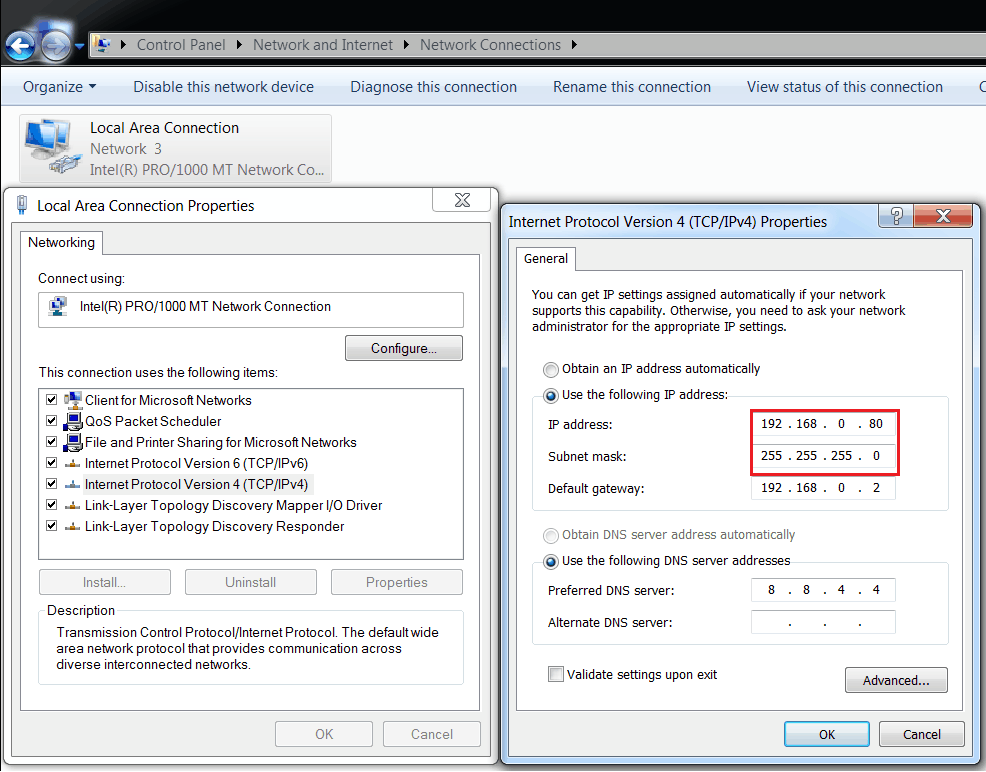
Configure PC’s IP which must have the same network segment as LR200E (LoRa to Ethernet)
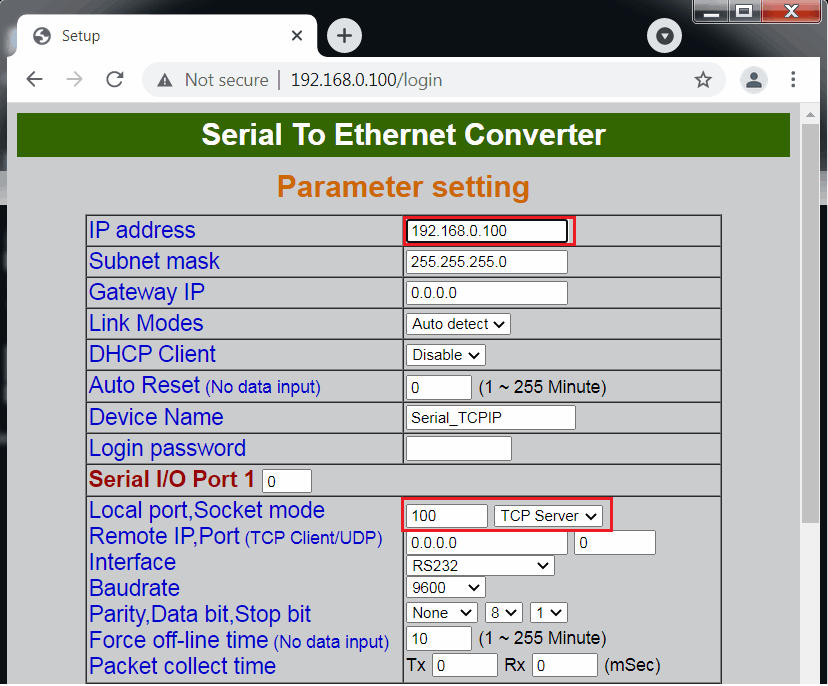
Open a browser and login to LR200E to configure its Ethernet Settings
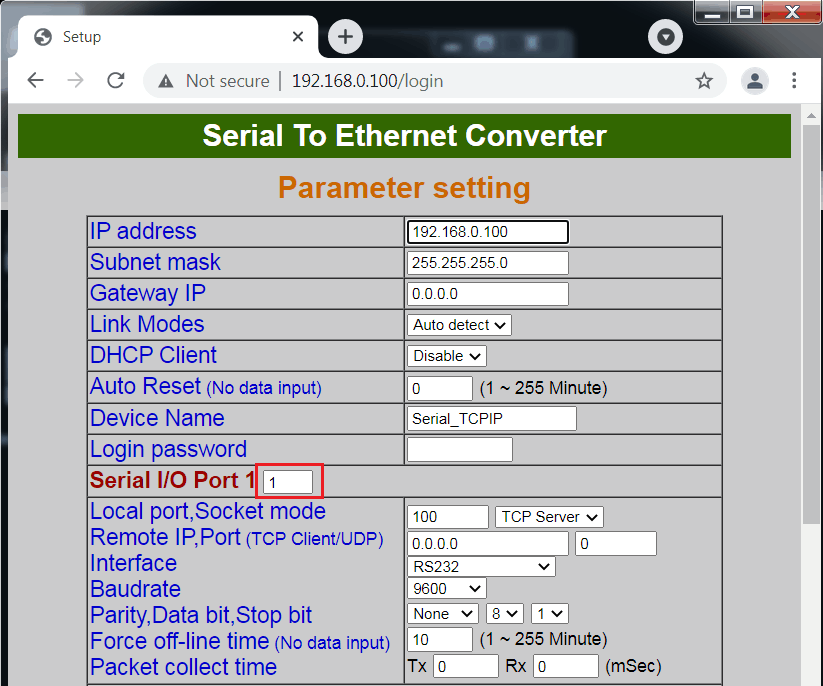
Assign with IP (must have the same network segment as PC’s IP)
Set as TCP Server with a Port number
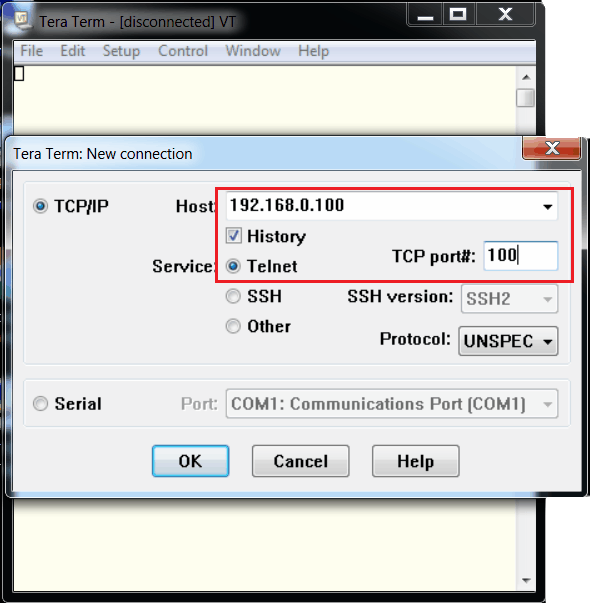
Run Tera Term and configure the IP with Port number of the destination device (LR200E)
Then click <OK> to connect to LR200E
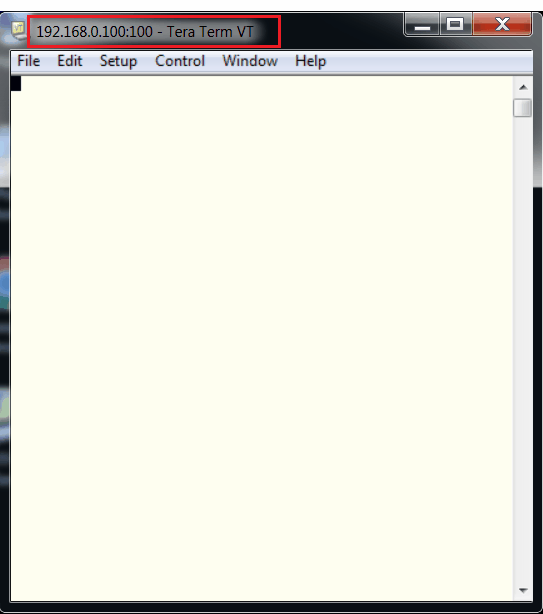
The IP and Port number of the LR200E will be displayed at the top of Tera Term Windows means connected successfully to LR200E
LR200E Ethernet Settings browser page
Serial I/O Port 1 field becomes “1” means LR200E is being connected
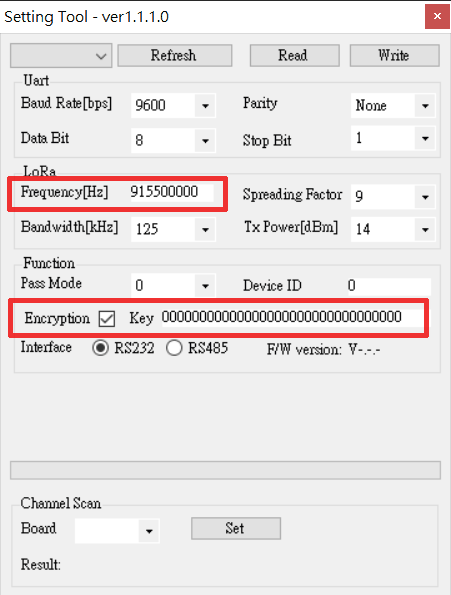
Configure LR200E (LoRa to Ethernet) LoRa Settings
LR200S main board is required for LoRa Settings Configuration
LoRa converter will only communicate with other LoRa converters grouped together
A grouped LoRa converters means each of them has the same LoRa Frequency and Encryption Key
Please refer to LoRa Configuration Guide for details.
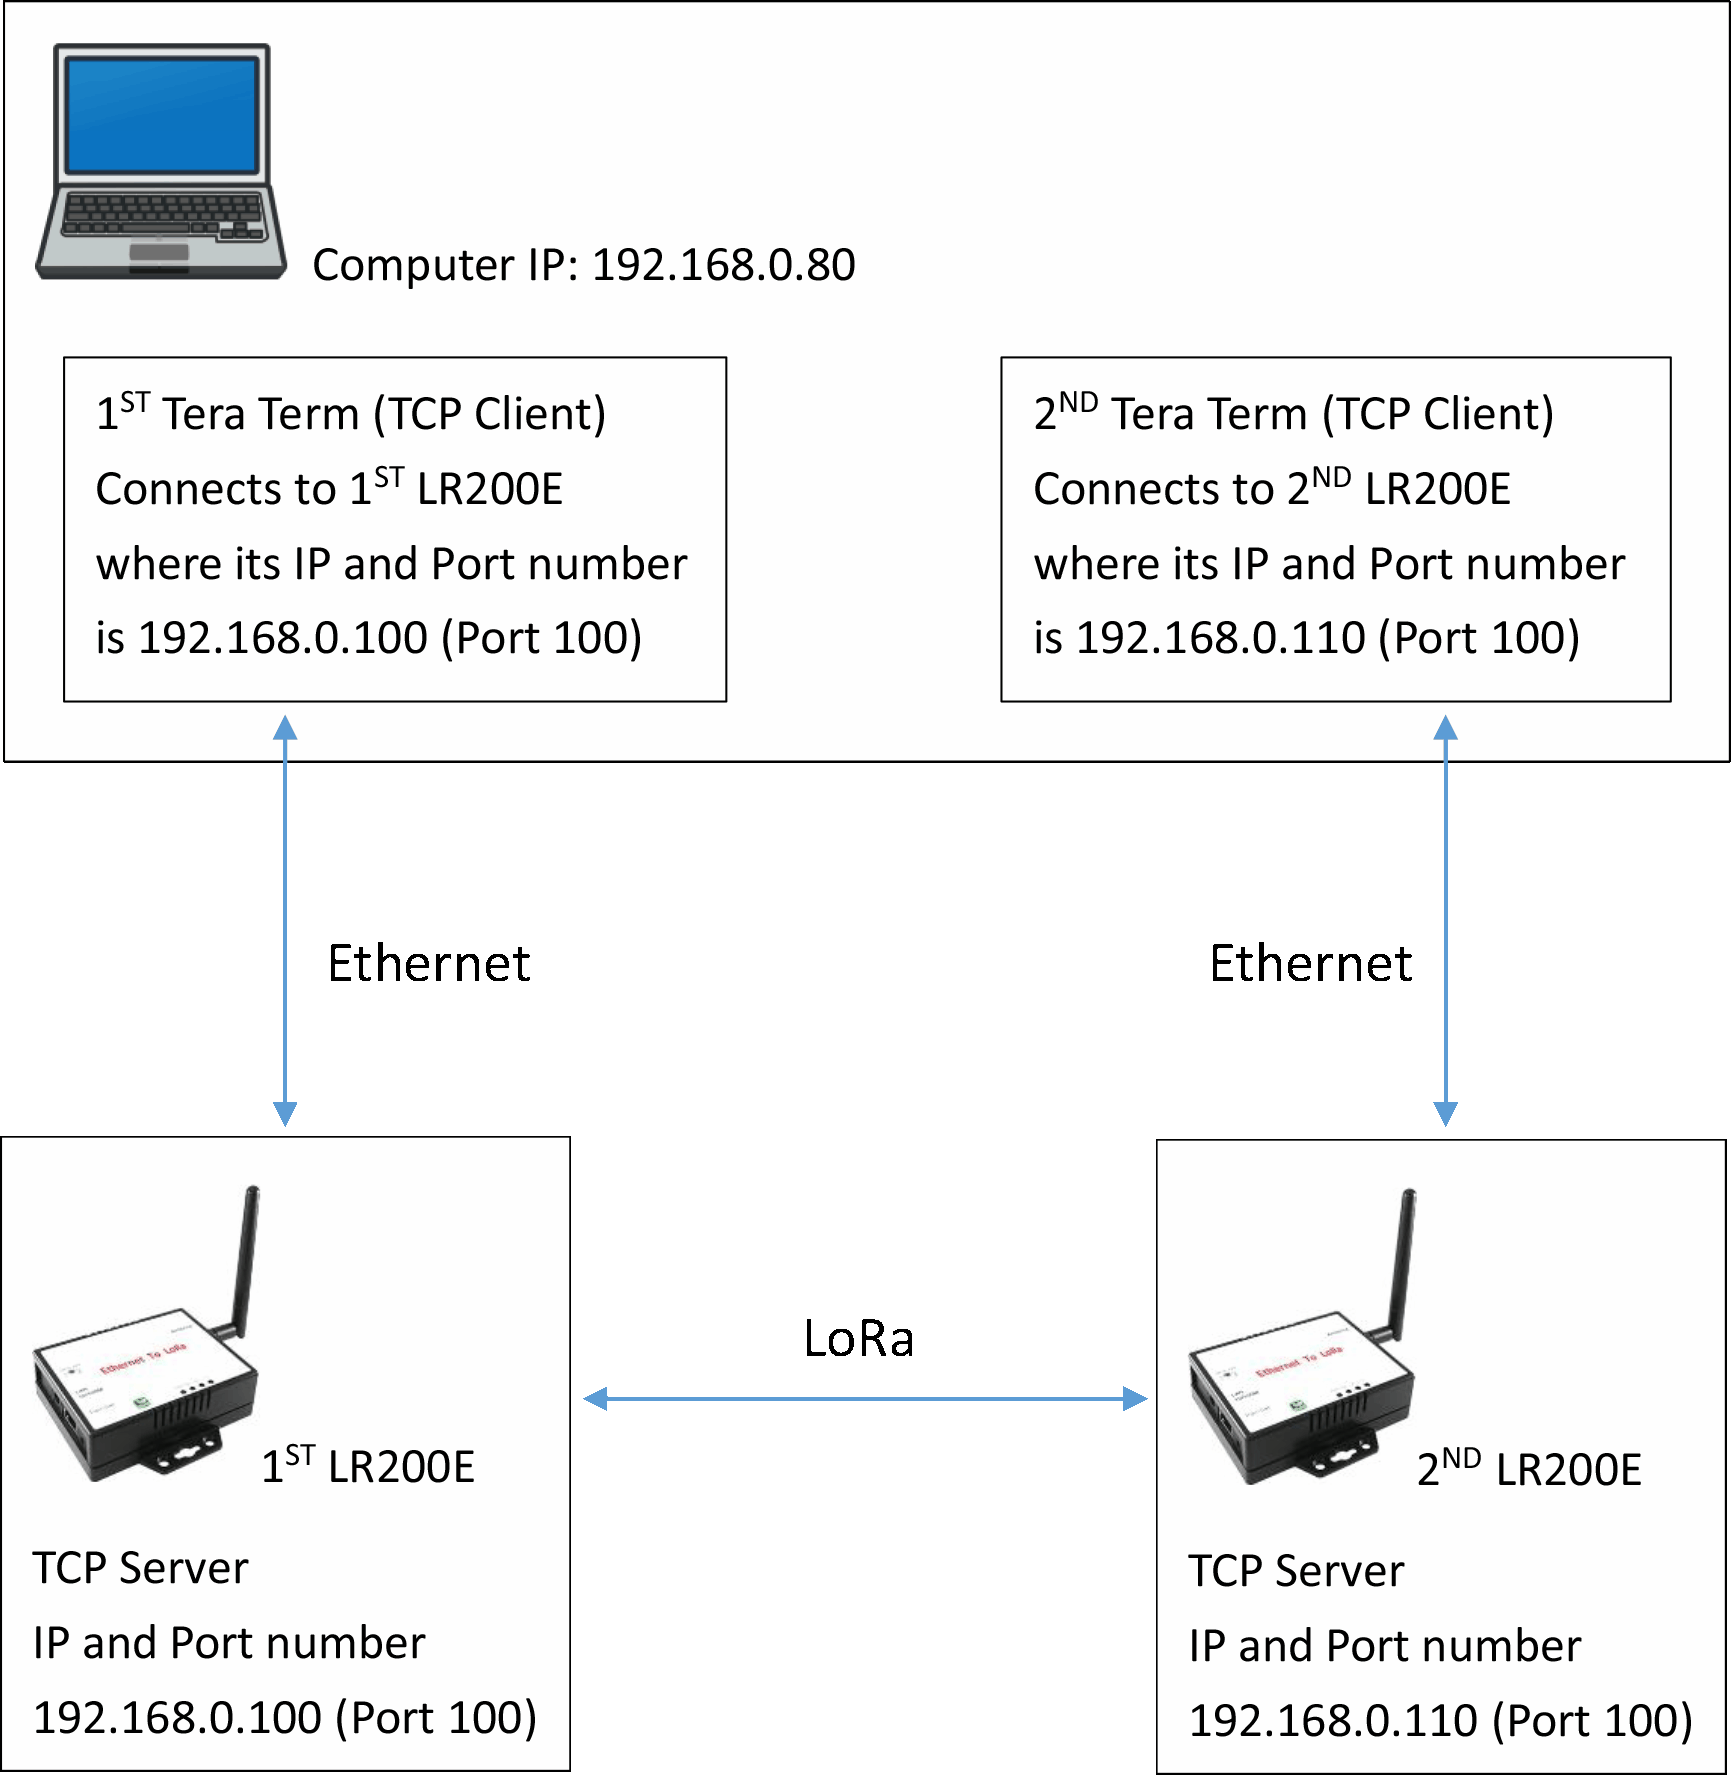
Repeat all above configuration on the 2nd computer and the 2nd LR200E each with correct settings configured and make sure both are Ethernet connected successfully. Then make sure two units of the LR200E are grouped which means they both are connected over LoRa. Then Ethernet to Ethernet over LoRa bridge is created as the following Flow Chart.
Configuration in the following Flow Chart are examples showing workable data transmission of Ethernet to Ethernet over LoRa bridge. Users can edit configuration as needed providing that
All the computers and LR200E (LoRa to Ethernet) must have the same network segment. Assuming IP address is “192.168.xxx.yyy” which means each’s IP address must be the same in “192.168.xxx” and different in “yyy”.
All LR200E (Ethernet to LoRa) must be grouped together which means each has the same LoRa Frequency and Encryption Key.
Ethernet to Ethernet over LoRa bridge Flow Chart

Data transmission from 1st computer to 2nd computer
1st PC (192.168.0.80) Tera Term sends data to 1st LR200E (192.168.0.100:100) via Ethernet
1st LR200E sends data to 2nd LR200E via LoRa
Data received by the 2nd LR200E (192.168.0.110:100) will be collected by 2nd PC (192.168.0.70) Tera Term.
Data transmission from 2nd computer to 1st computer
2nd PC (192.168.0.70) Tera Term sends data to 2nd LR200E (192.168.0.110:100) via Ethernet
2nd LR200E sends data to 1st LR200E via LoRa
Data received by the 1st LR200E (192.168.0.100:100) will be collected by 1st PC (192.168.0.80) Tera Term.
If you do not have a 2nd computer, you can run a 2nd Tera Term on the 1st computer and configure the 2nd Tera Term connecting to the 2nd LR200E. In this case, the data transmission loops from one Tera Term back to the other Tera Term on the same computer.
Data Loops from the 1st Tera Term back to the 2nd Tera Term
The 1st Tera Term sends data to the 2nd LR200E (192.168.0.100:100) via Ethernet
The 1st LR200E sends data to the 2nd LR200E via LoRa
Data received by the 2nd LR200E (192.168.0.110:100) will be collected by the 2nd Tera Term.
Data Loops from the 2nd Tera Term back to the 1st Tera Term
The 2nd Tera Term sends data to the 2nd LR200E (192.168.0.110:100) via Ethernet
The 2nd LR200E sends data to the 1st LR200E via LoRa
Data received by the 1st LR200E (192.168.0.100:100) will be collected by the 1st Tera Term.